Thursday 10 November 2011

Self Evaluation of my work and my 5 point Action Plan

I feel over all in this project I worked well in the group tasks and contributed well to all the tasks in the group as I put the powerpoint together for my group as well as research 2 sections of the presentation.

I also feel for the Flux task 2 part 1 body of work I didnt do myself justice and liked ideas and most crucially final design designs, I am pleased with the out some with a couple of the designs for example the first two I feel work really effectively and suit the brief perfectly. Other wise I feel like I could have produce a better body of work over all.

For Flux task 2 part 2 I eventually produced a good set of prints which represents the opposites of Life and death perfectly. I feel I experimented well on this task trying to use Rayograms and Screen printing. I feel I could have expanded on more design ideas before come to my final design. And should manage my time better to make sure I produce more designs and body of work for the next Projects. I feel this is where I most need to improve my self to make sure I produce my best work.

I really enjoyed experimenting with different papers and textures using screen printing and would like to look further into screen printing in my next briefs as I really enjoyed the printing process!

My 5 point Action plan

  1. Start applying for unpaid apprentiships and summer work with in design agencies to gain work experience.
  2.  my work to local companies for free/ enter design competitions to help build my portfolio of work.
  3. Work on presenting my ideas and work verbally in presentations in front of groups of people.
  4. Manage my time on University work and self-directed work better to produce the best work I can possibly produce.
  5. Try working on new materials, techniques and software knowledge to improve my work all round. 

Further print experimentation

On the image below I printed the image off from my computer and them painted tissue in white acrylic paint and the placed the image over the paper and rubbed the image into the tissue paper and let dry a little before peeling the tissue paper off leaving back a thin grundgy of paint and bits of issue paper


The second experiment I wanted to use is instead of just using the prints as a set of prints in a train I was thinking if I could use the images individually as a tag or stencil for graffiti. My example here is by tagging a news paper article about murder and death with my image of the skeleton which represent death. I feel these prints could work well individually as well a set from this experiment.

Texture material experimentation expanded

These are my final prints I produced this is printed on textured white material which is used mainly for covering hard back books and has a mesh texture to it but the mesh it more tightly packed than the previous material I experimented on. This as with the tracing paper prints ended up as one of my favorite prints as the material holds the paint well and gave a crisp finish and looked quite sleek and ran well as a train of prints. 

For my final piece and design I'm going to select the my 3 favorite prints and mount them up as 3 alternative trains of prints. I feel that amount my selection will be this Textured print and the Tracing paper prints.


Textured materials

After wanting to experiment on different textures and materials. I tried printing on this mesh material I makes the prints look really faded but gives a ghostly effect to the print as if to represent life if fading and  dying out. The Print looks more effective when placed on top of another sheet of card or board


Parcel Print

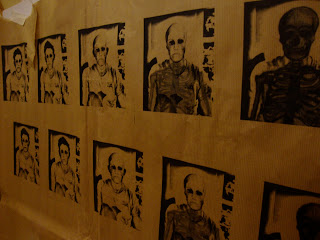
I tried to Print my designs on brown textured parcel paper,to try and print of different colors and texture paper to see if they affect the placement of the prints. I like the streakiness and lines in the parcel paper it adds to the texture of the print.


Transparent Prints

On these Prints I tried printing onto tracing paper to achieve a see through/hazy background but have it possible to see see items under the print if placed in front of other prints/photos or text. You can see an example of this in the bottom two pictures where I have places them in front of a photo collection. These turned out to be among my favorite prints I made.


Off White Screen Print

After testing printing on white I tried printing on an off white/ cream color paper to see if this changes the aesthetics of image and presents it better than on white paper. I feel the off White paper doesnt help the images stand out from the paper but adds to the worn degraded effects of the prints.